How to pipe up a storage water heater
The full layout: what sits between the riser and the tank
On the cold side, every storage heater — electric or indirect — gets the same chain, easiest to read from the tank outwards: a tee with a drain cock right on the inlet, then a combined check-and-relief valve, then an isolation valve — and from there the supply line to the riser. The hot side is simpler: an isolation valve and the line to the taps.
The drain tee sits specifically between the tank and the valve: further down the chain there's a check valve, and the tank won't drain through it. No shut-off valve goes on that stretch, but a tee with a drain cock doesn't count as one — it doesn't block the flow.
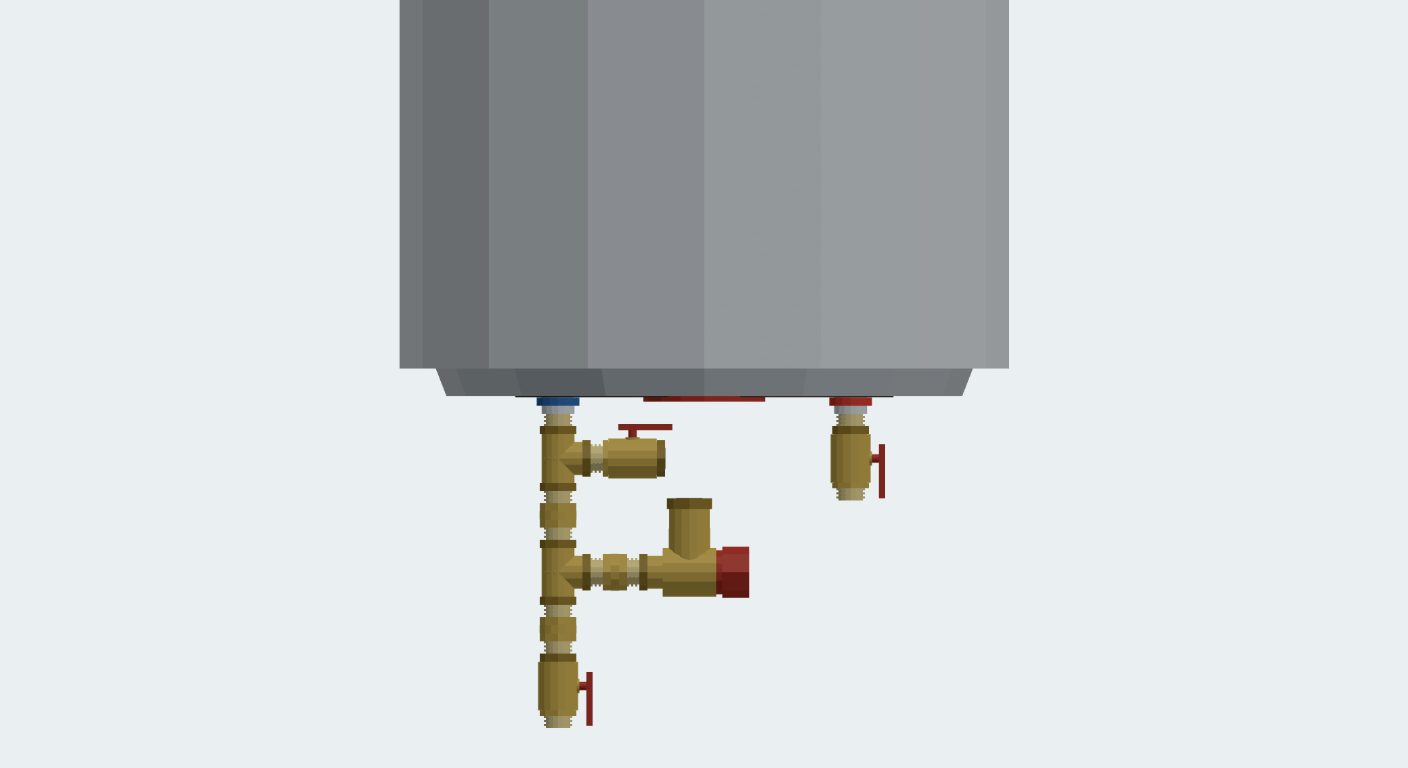
- Tee with a drain cock — the only way to empty the tank: it won't drain itself through the taps.
- Combined check-and-relief valve: the check part stops hot water pushing back into the cold riser, the relief part vents excess pressure. Discharge piped down where you can see it.
- Isolation valve — service the heater without shutting off the whole flat.
- No expansion vessel in the basic layout: it's an option “to stop the dripping” — more on it below.
Three parts you can't skip
The relief valve is required by every storage heater's manual. If the thermostat fails and the element never switches off, tank pressure climbs towards bursting — the valve vents it first. Because it's the last line of defence, the rule is absolute: no shut-off valve of any kind between the relief valve and the tank — a tap there cancels the protection.
The check valve solves a different problem: heated water expands, and without it the tank would push hot water back into the cold riser — you'd be heating the riser at your own expense and your neighbours would get warm “cold” water. It also keeps the tank from draining back through the supply if the riser loses water, so the element never runs dry. In off-the-shelf “safety groups” the check valve and relief valve come combined in one body.
Isolation valves on the cold and hot side are there for servicing: removing the heater to change the anode or element without draining or shutting down the rest of the flat. Fit them with union connections on both sides.
Pipe the relief valve discharge downwards through a short visible run or a tundish: drips are diagnostics — you want to see them, not hide them in a sealed hose.
Why the relief valve drips
Heating water from 10 to 60 °C expands it by roughly 2%: in an 80-litre tank that's about a litre and a half with nowhere to go — the check valve has sealed the circuit. Pressure rises until the relief valve starts venting the excess. So a light drip during heat-up isn't a fault — it's normal operation, and most heaters live exactly like that, with the discharge simply piped to a drain.
If the dripping annoys you — wasted water, valve wear — there's an option: a DHW expansion vessel sized at about 10% of the tank volume. The membrane absorbs the expansion and the dripping stops. It is not mandatory. If you do fit one, it must be a potable-water vessel rated for DHW temperatures; a heating expansion vessel or a cold-water accumulator won't do — different membranes and ratings.
Connecting an electric heater step by step
- Shut the riser valve and relieve the pressure by opening the nearest tap.
- Screw a tee with a drain cock onto the cold inlet — the only point through which you'll ever empty the tank.
- Then the combined check-and-relief valve supplied with the heater (pipe its discharge down to a drain), then a union and an isolation valve. Between the valve and the tank — only the drain tee, no shut-offs of any kind.
- On the hot outlet: union and isolation valve, then the line to the taps.
- Open the cold supply and a hot tap: the tank fills until the tap runs in a steady, air-free stream. Only then switch the power on — a dry element burns out in minutes.
- Check every joint at working pressure and again after the first full heat-up: brass and seals settle slightly with temperature.
Connect the heater with rigid pipe or good-quality flexible connectors, but a flexible hose on the hot side has the shortest life of anything in the flat: replace it on schedule, not “when it bursts”.
Indirect cylinders: what changes in the piping
The water side of an indirect cylinder is exactly the same as an electric heater's: drain tee, check-and-relief valve, isolation valves. The difference is that the water is heated by a coil fed from the boiler — which adds a second, primary circuit.
With a wall-hung boiler that has a cylinder connection, the extra piping is minimal: the boiler's own three-way valve switches flow between heating and cylinder, driven by a sensor that slides into the cylinder's pocket. No extra pump — the boiler's own one does the work.
If the boiler has no cylinder output, a separate loading pump goes on the coil branch. Parallel branches (heating and cylinder) then need check valves — without them, the idle circuit gets spun by the neighbouring pump's parasitic flow, and radiators warm up in summer.
In every variant a strainer belongs on the return before the boiler: sludge from the heating system clogs the boiler's heat exchanger and pump impellers first.
DHW priority is normal behaviour: while the cylinder heats, the heating pauses. For a 100–150 l cylinder that's 20–40 minutes — the house doesn't have time to cool.
Hot water recirculation: when you need it
If the farthest tap is more than 8–10 metres of pipe from the heater, you wait for hot water while the cooled contents run to waste. Recirculation fixes that: a return line runs from the far point back to the tank, and a small pump slowly cycles the loop — hot water is at the tap instantly.
What it adds: a DHW-rated recirculation pump (bronze or stainless — a cast-iron heating pump doesn't survive potable water), a check valve on the return line, and ideally a timer or thermostat: running the loop around the clock means losing heat through the pipe walls around the clock.
Some tanks have a dedicated recirculation port. If yours doesn't, the return line joins a tee on the stretch between the safety group and the tank — with a check valve on the return line itself, so the pump can't push water into the cold supply.
What temperature to set
- 55–60 °C is the working range: legionella multiplies at 20–45 °C and only dies slowly at 50 °C, while above 60 °C scale grows faster on the element and standing losses climb.
- Saving at 40–45 °C is a false economy: hygiene is borderline and the usable reserve shrinks — the same bath empties the tank sooner because you dilute the hot water less.
- Once a month, run the tank at maximum for a couple of hours — thermal disinfection.
- In hard water, every degree above 60 °C speeds up scaling: the anode and element will need attention more often.
Common mistakes
Tips
Common questions
What goes on the cold water inlet of a water heater?
Counting from the tank: a tee with a drain valve, then the combined pressure relief and check valve, then an isolating valve, then the supply from the riser. There must be no shut-off device between the relief valve and the tank — a valve in that spot cancels the last line of defence.
Why does the pressure relief valve drip?
Heating water from 10 to 60 °C expands it by about 2 %: in an 80-litre tank that is around a litre and a half with nowhere to go. A light drip during heat-up is the valve doing its job. A constant drip with no heating means dirt on the seat, or mains pressure above the valve setting.
How does an indirect cylinder differ from an electric one?
The water side is identical: drain tee, combined relief and check valve, isolating valves. The difference is the heating circuit. A wall-hung boiler with a cylinder output only needs its own diverter valve and a sensor in the tank pocket; without that output you add a dedicated loading pump and check valves on the parallel branches.